Bertolini Pump Connecting Rod Price : 10 $
Product code : BERTOLİNİ1

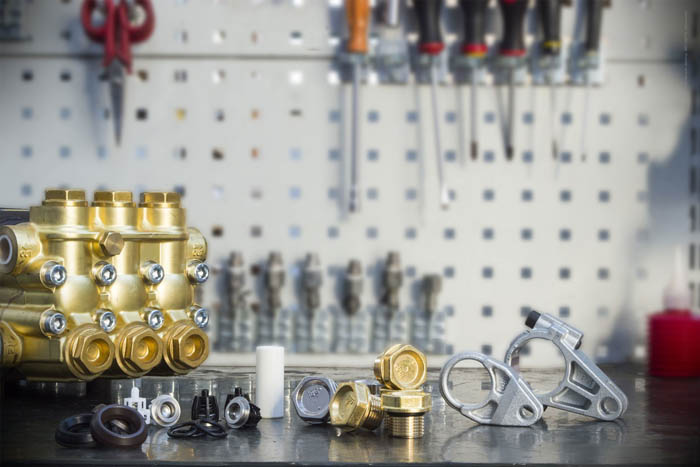
The connecting rod is the part that connects the ceramic piston and the crank shaft. Ceramic Piston rotates the crankshaft by turning the axial movement in the cylinder into rotational motion.
We will show you this training video of how to change the connecting rods of the Annovi Reverberation Pump we have prepared for you today. Annovi Reverberi is the sole part of the ar pumps.
Some pumps, such as Interpump, Hawk, Rottest and so on. The connecting rod consists of 2 pieces. Using the Allen Key it will be easier to dismantle the upper parts of these arms, called caps. We chose the hard one for you, and for that reason we will change the connecting rods of the Ar Pump. We made his video.
The connecting rods of the pumps are manufactured from aluminum material, as it is both practical and practical, as it is both good quality and lightweight.
Some connecting rod has a hole in the cap part, this hole helps to lubricate the crank better. The Ar Pump is also absent because this lubrication hole is not needed.
Unfortunately, a connection failure is a situation we often encounter. There are many reasons for breakdown, wear and breakage of the connecting rod.
You should change the oil of your washing machine pump after an average of 400 hours of operation. If you do not change the oil of your pump, the oil quality will fall and damage the connecting rod.
The oil of the pump of your washing machine should be oil 20 – 50 grit. If you use thin or thick oil, this will damage the connecting rod arms.
If you look at the oil sight of the pump, it should be at half level. It is about 900 gr for Annovi, Comet, Hawk pumps and 1000 gr for Rottest pumps.
Allow your pump to cool down for long periods of use. The connection rods of your pump, which operate at high temperatures for too long, are also damaged.
Before replacing the Annovi Reverberation Pump Connecting Rod, unscrew the oil drain plug located under the oil pump inside the pump with the key number 17.
When the old oil in the pump has been thoroughly drained, open the rear aluminum cover of your pump using the 5-key allen key with 5 metric bolts on the cover. Optionally clean the inside of the pump using diesel, gas oil or special cleaner after you open the back cover of the pump and purge the pump from all the old oil.
To replace the Connecting Rods of your pump, unscrew the pump pre-block by opening 8 Metric 8 imbus plugs located on the front of your pump using the 6 number allen wrench.
After the front block of your pump has been disassembled, loosen the nut 14 holding the ceramic pistons and remove the ceramic piston by carefully taking care of it.
Carefully remove the thin puller under the ceramic piston in the same manner.
Washing Machine Open 4 metric 8 imbus bolts on the side covers of your pump using the allen key 6.
Unscrew the crankshaft with the help of pulling without damaging the 2 bearings in the crank shaft which survives the side covers.
Pull the crankshaft toward you and carefully remove it from inside the pump.
Be sure to pay attention before disconnecting the connecting rod. If there is a warning such as a sign or a sign on the pump, collect it according to this action. Very rarely, some pumps have this sign. For example Hawk Brand pumps have notches in their connecting rods. Interpump and Rottest pumps are numbered 1-2-3 in some of the connecting rods. Since the three branches of the Annovi pump are the same, no such trace is needed. So you do not need to pay attention.
Unscrew the connecting rod in the crankshaft you remove from the crankshaft.
Use a screwdriver and a small screwdriver to pin the pins between the arm and the connecting rod.
Replace the rods that survive the pins with the new ones.
I can pin the pins again.
Let’s also mount our crankshaft connecting rods again.
Attach the crankshafts to the crankshaft very precisely. We can use wooden wedges or a soft material for this job, and we can play it by clicking lightly with a hammer.
Grasp the crankshaft and gently place it in the pump and let the piston arms push back into place without damaging the oil felts inside.
Replace the cover screws by inserting your crankshaft into the covers without damaging the bearing bearings and oil skimmers on the side covers of your pump.
Attach the thin washers located behind the ceramic piston.
Before installing the ceramic piston, check the seal on the ceramic piston sleeve and replace if necessary.
After replacing the ceramic piston, let the pulp and nuts tighten without damaging the ceramic piston. Let’s not forget that screw fasteners, which is very important before the moment.
Let’s just squeeze a few drops in a nut. (Loctite 542) If you put the nut too tight, you will loose the piston and loose the gap
These services offered by Rota Machinery Company to its valued customers are sometimes stolen by abusive labor thieves and published on their websites as if they are their own. All images and articles on our website are legally protected by copyright. When articles and pictures copied by labor thieves are detected, they will be absolutely criminally responsible for the law in every condition and circumstance.


Değerlendirmek ister misiniz?